Vue3 源码学习和调试
搭建源码调试环境
- 克隆源码,下载到本地
git clone git@github.com:vuejs/core.git
- 安装依赖,使用的是 pnpm
cd core && pnpm install
- 打包
vue文件
pnpm run dev
运行 pnpm run dev 创建 packages/vue/dist 目录,生成两个文件 vue.global.js 和 vue.global.js.map,是打包后的 vue 文件
- 启动本地服务
ctrl + c 结束进程,执行 pnpm run serve
pnpm run serve
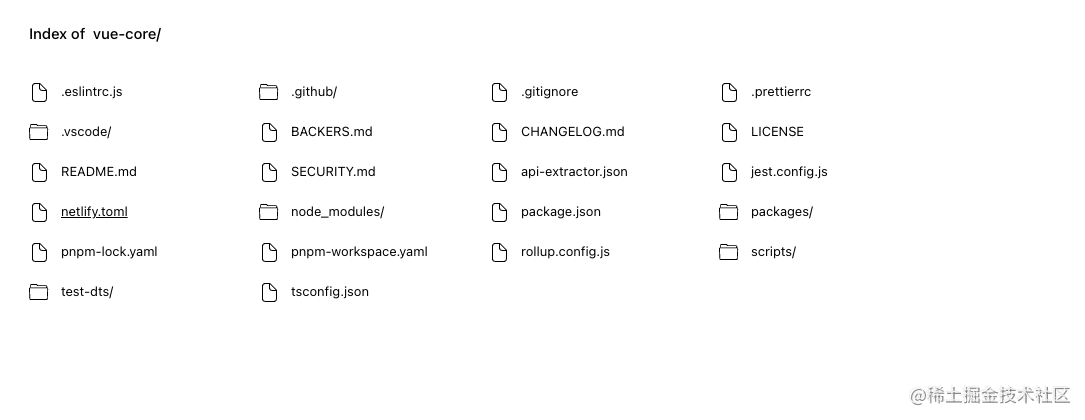
上面命令启动一个服务,默认启动一个端口,打开 localhost,显示项目的目录结构界面

进入界面事例,点击 packages =》 vue =》 examples,选择一个 classic/todomvc,进入 todomvc.html界面

也可以在 packages/vue/example 目录下新建一个 html 文件,引入 dist/vue.global.js 文件,安装 http 服务插件 VSCode Live Server,在本地启动服务打开 html 文件
- 打开浏览器开发者工具
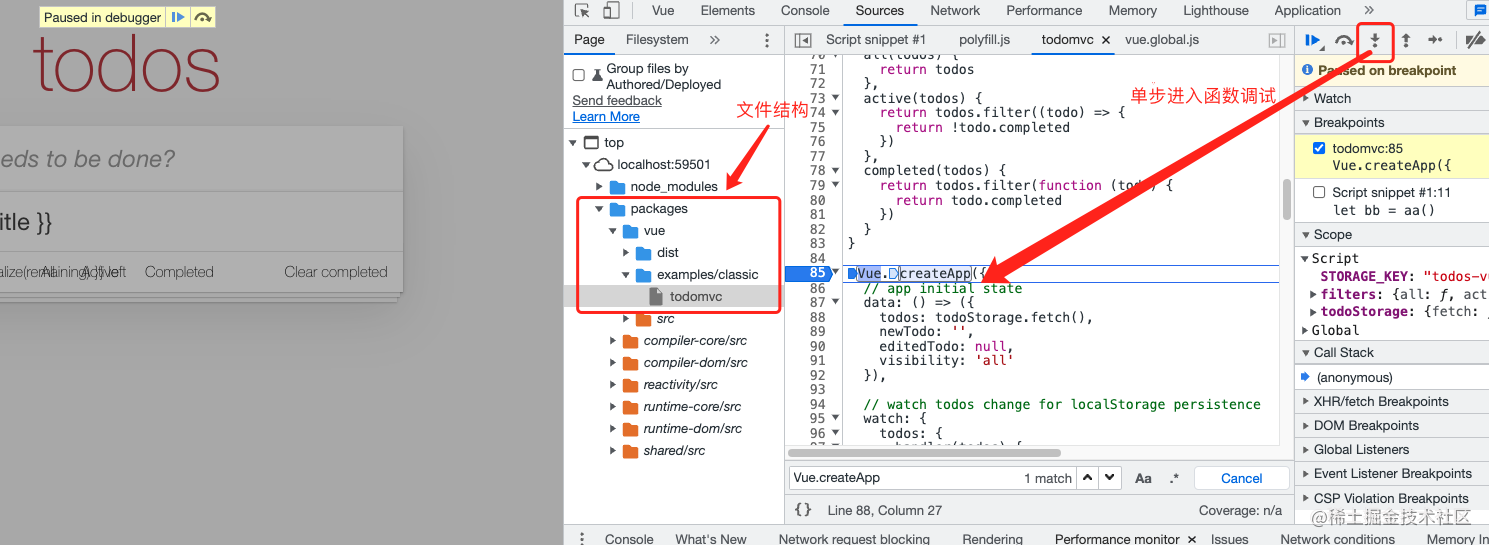
在 source 面板,快捷键 cmd + p,输入 todomvc,进入 todomvc 文件源码

cmd + f 搜索 Vue.createApp,在函数方法打上断点单步调试,进入 createApp 函数;
查看源码文件的路径结构,右键鼠标,选择 Reveal in sidebar 在左侧边栏打开

这时可以看到 createApp 函数的真面目,在 /packages/runtime-dom/src/index.ts

项目架构
开始阅读源码前,先从全局的角度对框架的设计有整体的认知,否则在阅读过程中,容易被细节困住,迷失方向。
先从目录结构开始分析,了解每个模块做哪些功能,模块与模块之间是如何划分和关联的。
Vue 3 从代码结构上进行了梳理,采用 monorepo 单体仓库模式管理项目代码,使用 pnpm workspace 方式实现。它将内部实现的部分抽象成了一个个模块放在 packages 下,每个 packages 子目录都有自己的类型声明、单元测试。 package 可以独立发布,这样设计便于维护、发版和阅读。例如我们可以单独引用 reactivity 这个模块,在导入这些软件包时,需要 @vue/前缀。
// 目录结构分析
├── .github              // github 工作流,issue 模版,代码贡献指南
├── .vscode              // vscode 编辑器的配置
├── packages             // vue 源码核心包,使用 pnpm workspace 工作区管理
│   ├── compiler-core    // 编译器(平台无关),例如基础的 baseCompile 编译模版文件, baseParse生成AST
│   ├── compiler-dom     // 基于compiler-core,专为浏览器的编译模块,可以看到它基于baseCompile,baseParse,重写了complie、parse
│   ├── compiler-sfc     // 编译vue单文件组件
│   ├── compiler-ssr     // 服务端渲染编译
│   ├── reactivity       // vue独立的响应式模块,可以与任何框架配合,使用proxy
│   ├── reactivity-transform  // 响应式实验功能,目前仅用于测试
│   ├── runtime-core     // 与平台无关的运行时。有虚拟DOM渲染器,vue组件和各种API。可针对某个具体平台实现高阶runtime,比如自定义渲染器
│   ├── runtime-dom      // 针对浏览器的runtime。包含处理原生DOM API
│   ├── runtime-test     // 一个专门为了测试而写的轻量级 runtime。由于这个 rumtime 「渲染」出的 DOM 树其实是一个 JS 对象,所以这个 runtime 可以用在所有 JS 环境里。你可以用它来测试渲染是否正确。
│   ├── server-renderer     // 服务端渲染
│   ├── sfc-playground
│   ├── shared             // 内部工具库,不暴露API
│   ├── size-check          // 简单应用,用来测试代码体积
│   ├── template-explorer  // 用于调试编译器输出的开发工具
│   └── vue                 // 面向公众的完整版本, 包含运行时和编译器
│   └── vue-compat          // 用于兼容 vue2
│   ├── global.d.ts      // 声明文件
├── scripts              // vue3脚本文件,包含配置文件,进行编译和打包等
│   ├── bootstrap.js
│   ├── build.js
│   ├── checkYarn.js
│   ├── dev.js
│   ├── release.js
│   ├── setupJestEnv.ts
│   ├── utils.js
│   └── verifyCommit.js
├── test-dts             // 测试文件
│   ├── README.md
│   ├── component.test-d.ts
│   ├── componentTypeExtensions.test-d.tsx
│   ├── defineComponent.test-d.tsx
│   ├── functionalComponent.test-d.tsx
│   ├── h.test-d.ts
│   ├── index.d.ts
│   ├── inject.test-d.ts
│   ├── reactivity.test-d.ts
│   ├── ref.test-d.ts
│   ├── setupHelpers.test-d.ts
│   ├── tsconfig.build.json
│   ├── tsconfig.json
│   ├── tsx.test-d.tsx
│   └── watch.test-d.ts
├── CHANGELOG.md    // 多个版本提交记录、时间和内容
├── LICENSE         // MIT协议是所有开源许可中最宽松的一个,除了必须包含许可声明外,再无任何限制。
├── README.md       // 项目说明
├── api-extractor.json   // 这是所有包的共享基本配置文件
├── jest.config.js       // 测试配置文件
├── package.json         // 项目依赖
├── rollup.config.js     // rollup打包配置文件
├── tsconfig.json        // 定了用来编译这个项目的根文件和编译选项
├── pnpm-lock.yaml       // 锁定依赖版本
└── pnpm-workspace.yaml  // pnpm 工作区
compiler-core: 编译器(平台无关),例如基础的baseCompile编译模版文件,baseParse生成 ASTcompiler-dom: 基于compiler-core,专为浏览器的编译模块,可以看到它基于baseCompile,baseParse,重写了 complie、parsecompiler-sfc: 编译 vue 单文件组件compiler-ssr: 服务端渲染相关的reactivity: vue 独立的响应式模块runtime-core: 也是与平台无关的基础模块,有 vue 的各类 API,虚拟 dom 的渲染器runtime-dom: 针对浏览器的 runtime。包含处理原生 DOM APIruntime-test:一个专门为了测试而写的轻量级 runtime。由于这个 rumtime 「渲染」出的 DOM 树其实是一个 JS 对象,所以这个 runtime 可以用在所有 JS 环境里。你可以用它来测试渲染是否正确。shared:内部工具库,不暴露 APIsize-check:简单应用,用来测试代码体积template-explorer:用于调试编译器输出的开发工具vue:面向公众的完整版本, 包含运行时和编译器api-extractor.json—— 所有包共享的配置文件。当我们 src 下有多个文件时,打包后会生成多个声明文件。使用@microsoft/api-extractor这个库是为了把所有的.d.ts合成一个,并且,还是可以根据写的注释自动生成文档。template-explorer: 用于调试编译器输出的开发工具。您可以运行 npm run dev dev template-explorer 并打开它index.html以获取基于当前源代码的模板编译的副本。在线编译网址:vue-next-template-explorer.netlify.app/#
Vue 源码入口
首先阅读 官网 了解功能使用,Vue3 实例化应用不在采用 new 方式,而是使用 createApp
import { createApp } from 'vue'

createApp({
  data() {
    return {
      count: 0
    }
  }
}).mount('#app')
从上面调试在 createApp 打上 debug,进入这个函数,函数位置在文件 packages/runtime-dom/src/index.ts
export const createApp = ((...args) => {
  const app = ensureRenderer().createApp(...args)

  if (__DEV__) {
    injectNativeTagCheck(app)
    injectCompilerOptionsCheck(app)
  }

  const { mount } = app
  app.mount = (containerOrSelector: Element | ShadowRoot | string): any => {
    const container = normalizeContainer(containerOrSelector)
    if (!container) return

    const component = app._component
    if (!isFunction(component) && !component.render && !component.template) {
      if (__COMPAT__ && __DEV__) {
        for (let i = 0; i < container.attributes.length; i++) {
          const attr = container.attributes[i]
          if (attr.name !== 'v-cloak' && /^(v-|:|@)/.test(attr.name)) {
            compatUtils.warnDeprecation(
              DeprecationTypes.GLOBAL_MOUNT_CONTAINER,
              null
            )
            break
          }
        }
      }
    }

    // clear content before mounting
    container.innerHTML = ''
    const proxy = mount(container, false, container instanceof SVGElement)
    if (container instanceof Element) {
      container.removeAttribute('v-cloak')
      container.setAttribute('data-v-app', '')
    }
    return proxy
  }

  return app
}) as CreateAppFunction<Element>
上面代码 createApp 创建应用时调用的方法实现流程
ensureRenderer是一个单例模式的函数,会返回一个renderer,如果无renderer则会调用createRenderer进行获取renderer,获得了一个app实例;- dev 环境下注册一个方法:
isNativeTag,挂载到app.config下面; - 获取到实例的
mount方法,并保存下来; - 重写实例的
mount方法;- 调用
normalizeContainer获取根元素容器; - 判断
template,获取需要渲染的模板; - 把容器的
innerHTML置空; - 调用上面实例的
mount方法; - 删除
v-cloak属性,添加data-v-app属性;
- 调用
- 返回 mount 后的代理;
从上面来看,createApp 主要做的事是调用 ensureRenderer().createApp(...args) 创建一个 app 实例,然后重写 mount 方法挂载,返回这个实例,整个实例化和挂载的流程很清晰,细节在后面深入研究分析。
其次,当代码逻辑比较复杂难读懂的时候,可以从测试用例入手。比如某个方法使用在官网上描述不是很清晰,想知道的更多些,比起直接深入到源码中,测试用例是一个相对快捷省时的方式。
测试文件后缀是 spec,例如 createApp 测试文件createApp.spec.ts ,有两条测试用例
- 可以挂载到
svg元素上 - 不应该改变原来的根组件选项对象
而且也给出对应修复的 issue,还可以去到 issue 上了解这个功能的背景
describe('createApp for dom', () => {
  // #2926
  test('mount to SVG container', () => {
    const root = document.createElementNS('http://www.w3.org/2000/svg', 'svg')
    createApp({
      render() {
        return h('g')
      }
    }).mount(root)
    expect(root.children.length).toBe(1)
    expect(root.children[0] instanceof SVGElement).toBe(true)
  })

  // #4398
  test('should not mutate original root component options object', () => {
    const originalObj = {
      data() {
        return {
          counter: 0
        }
      }
    }

    const handler = jest.fn((msg) => {
      expect(msg).toMatch(`Component is missing template or render function`)
    })

    const Root = { ...originalObj }

    const app = createApp(Root)
    app.config.warnHandler = handler
    app.mount(document.createElement('div'))

    // ensure mount is based on a copy of Root object rather than Root object itself
    expect(app._component).not.toBe(Root)

    // ensure no mutation happened to Root object
    expect(originalObj).toMatchObject(Root)
  })
})
总结思考
阅读源码,选择一个合适的工具让代码先跑起来,能够在源码上调试,然后理清楚代码组织关系及用途,单点突破,带着问题和目的去阅读,利用好单元测试。同时也要权衡利弊,该跳就跳,长期处于蒙的状态很容易走进死胡同,可以标记回头再看;利用搜索引擎,结合网上的源码分析资料理解。
 jeffery-blog